
Summary
UPDATE – FEBRUARY 2024
SharePoint Online recently made a change to the storage location of the Image Column type from Site Assets to Attachments. This post has been updated from the original Site Assets location to include Attachments. See ‘Step 10 with Attachments’
No-code/low-code platforms, such as Microsoft Power Automate, has transformed the days of centralized development teams to the hands of the end-user looking to increase productivity. The abstraction of code by connecting visual connectors and action boxes together and passing content between them makes it quick to automate repeatable tasks. However, when a connector does not provide expected content, we must pursue creative routes. That is the case for this post where a SharePoint List column of type ‘Image’, aka Thumbnail, does not appear in Power Automates SharePoint Connector content.


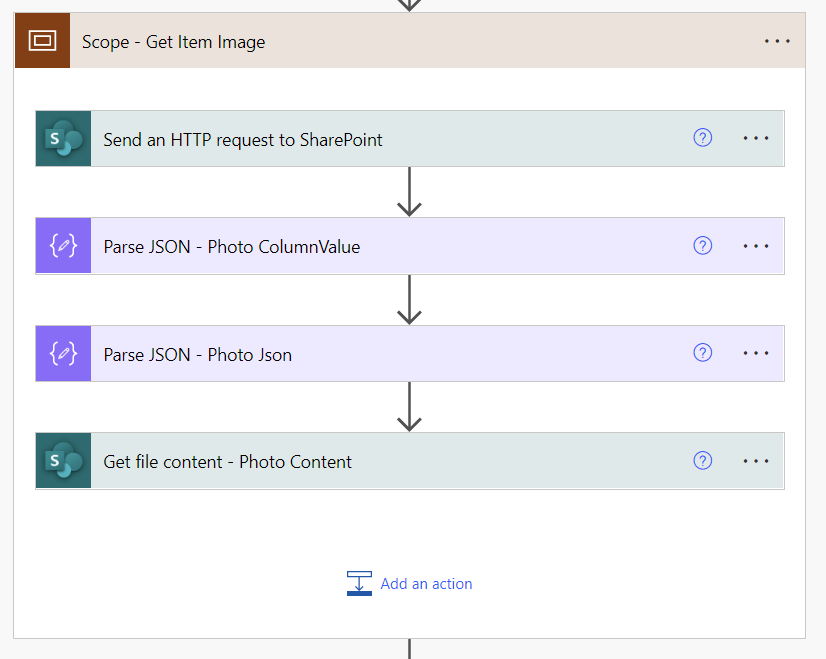
The route to solve this scenario is to utilize the content we have from the list item and then add additional connectors and actions to pull the image from SharePoint itself via its API. As we have the list item content from the default SharePoint Connector, we can use its data to get the Image metadata by first parsing the SharePoint Column and then the Value to get it into a typed content format. Last step is to use the typed content to pull the image directly. This is achieved through a 4-step process as the Scope below illustrates.
Once we have the image content from the Photo column, we can use it for downstream actions such as sending it embedded in an email.
As the image depicts, we can also link to the Photo in which case the 4th step can be omitted as the typed metadata content has the information needed to link directly.

The remainder of this post will go through the process step-by-step.
Prerequisites
- Microsoft 365 subscription (requires SharePoint, Power Automate, and Outlook)
- Visual Studio Code (optional)
Description
To start we need to create a SharePoint List that includes a column of type “Image”. In this example our SharePoint site is called ‘BBQTrails’ and the list is ‘BBQ Recipes’. These names will be referenced throughout the post. The columns for the list have been defined as follows with ‘Photo’ being the name of the Image column. Note: SharePoint uses ‘Image’ as the short description for the type, but the display name is ‘Thumbnail’ so these terms will be used interchangeably.

We then create a list entry for Texas Brisket, incl. a photo, that will be used in the Power Automate flow.

At this point we are all set to create our Power Automate flow. We will us a manual triggered flow for demonstration that will send an email of the photo. The photo will be displayed both in a linked and embedded format. The advantage of the linked photo is that the email size will be smaller, but the recipient must have access to the SharePoint site where it is stored to view it. Embedding allows the photo to be viewed by recipients who may not necessarily have access to the SharePoint site as the email will contain the photo itself.
Let’s get started!
Steps
1. Using Power Automate, create a new manual triggered flow and add the SharePoint action ‘Get Item’. Configure the action with the target site, BBQTrails, list, BBQ Recipe, and ID of the list item to get. In this case 1.
Note: Id number, 1, is the value from the ID column in the SharePoint list for the particular row of interest.

Optional, but recommended, is to test as we work through the flow to verify we are getting the right outputs. In the below example we confirm that we are accessing the Texas Brisket list item.

2. Add a new flow action with the SharePoint connector ‘Send an HTTP request to SharePoint’. We will use this action to send an API request to SharePoint for getting just the Photo column value of our Texas Brisket item by passing the ID of the list item.

We can also run the query directly in the browser to inspect the result. Replace the ID with the item ID, in this case 1.
Note; the space in ‘bbq recipes’ is URL escaped with a ‘%20’
https://torbenp.sharepoint.com/sites/BBQTrails/_api/lists/getbytitle('bbq%20recipes')/items(1)/Photo
To help explore the SharePoint API further, here are a few additional queries to get information about the list and its data:
‘/’ gets list metadata
https://torbenp.sharepoint.com/sites/BBQTrails/_api/lists/getbytitle('bbq%20recipes')/‘/fields’ gets metadata for all the fields
https://torbenp.sharepoint.com/sites/BBQTrails/_api/lists/getbytitle('bbq%20recipes')/fields‘/items’ gets all the items
https://torbenp.sharepoint.com/sites/BBQTrails/_api/lists/getbytitle('bbq%20recipes')/items‘/items(id)’ gets a single item by specified id
https://torbenp.sharepoint.com/sites/BBQTrails/_api/lists/getbytitle('bbq%20recipes')/items(1)‘/items(id)/columnInternalName’ gets the value of a column. The ‘columnInternalName’ can be discovered by using the /fields query above and find the value of the ‘InternalName’ element for the desired column.
https://torbenp.sharepoint.com/sites/BBQTrails/_api/lists/getbytitle('bbq%20recipes')/items(1)/Title3. Test the flow for ‘Send an HTTP Request to SharePoint’. When the test is complete, copy the content of the outputs body as we will need that later to define our content schema.

4. Add the Data Operation action ‘Parse Json’. For its content, select the body output of the SharePoint ‘Send an HTTP request to SharePoint’

5. On the Parse Json action, add the Schema by clicking ‘Generate from sample’, and paste the output copied from step 3.


6. Add the Data Operation action ‘Compose’. For its inputs, select ‘Photo’ from the Parse Json action.

7. Test the flow and when complete expand the Compose results to copy the outputs of the Photo.

Using Visual Studio Code or a text editor, paste the results to inspect the Photo column’s value in detail. Notice it contains a ‘serverUrl’ element to SharePoint and a ‘serverRelativeUrl’ element to the image we added to the list item. This tells us that when we added the image to the list item, SharePoint, stored it as a file in its SiteAssets folder for the SharePoint Site, BBQTrails, under a Lists subfolder with the list’s internally unique identifier. It is these two (2) elements we are after to get the image.

7. Delete the ‘Compose’ action created in step 6. We only needed it to capture a sample of the data that we will use next.
8. Add another Data Operation action ‘Parse Json’. For its inputs, select ‘Photo’ from the prior Parse Json action (same as Compose in step 6).

9. On the Parse Json action, add the Schema by clicking ‘Generate from sample’, and paste the output copied from step 6.


10. Add a new flow action with the SharePoint connector ‘Get file content’. We will use this action to get the content of the image file. Enter the Site Address to the SharePoint site, BBQTrails in this example. For the file identifier, we use the ‘serverRelativeUrl’ property from the Parse Json result, but we need do a couple of expressions to transform the data:
a) Using the ‘replace’ function we remove the redundant site information – /sites/BBQTrails
b) Using the ‘encodeUriComponent’ function we Url encode the remaining string
The resulting expression should look similar to the following:
encodeUriComponent(replace(body('Parse_JSON_-_Photo_Json')?['serverRelativeUrl'],'/sites/BBQTrails',''))


UPDATE – FEB 24
10 with Attachments – with the update of SharePoint Online storing the image in Attachments instead of Site Assets we might not receive a serverRelativeUrl property value. In that case, only the filename will be provided, and we need to construct a different File Identifier to the new attachment location. The constructed Url should look similar to the following:
https://torbenp.sharepoint.com/sites/BBQTrails/Lists/bbq%20recipes/Attachments/1/Reserved_ImageAttachment_[12][Brisket][1][1].png
Let’s decompose these elements and where to get them:
https://torbenp.sharepoint.com/sites/BBQTrails– is the Site path and we specify that as the Site Address field in the Get FIle content actionLists/bbq%20recipes/– is the relative List path and we can read that from the Get Item action in the beginning and itsPathpropertyAttachments/– will be the new static relative path to the Attachments location1/– is the ID for the list item and we read that from the Get Item action in the beginning and itsIDpropertyReserved_ImageAttachment_[12][Brisket][1][1].png– is the filename of the image that we obtain from the output of our Parse JSON – Photo Json action under thefilenameproperty
With this information, we replace the original expression in the File Identifier with the following expression:
encodeUriComponent(concat('/',body('Get_item')?['{Path}'],'Attachments/',body('Get_item')?['ID'],'/',body('Parse_JSON_-_Photo_Json')?['fileName']))
If you encounter a situation where you need to support both Site Assets and Attachments as file locations, I suggest creating a variable to hold the expression. Then add a condition after the Parse JSON – Photo Json action to check if the serverRelativeUrl is null. If true, set the variable to the updated expression, if false, use the original expression. Then add the variable as the File Identifier in Get File content.
11. Add a new flow action with the Data Operation connector ‘Compose’. We will use this action to compose an HTML structure of the email body to use for sending the embedded and linked image. For the embedded image we use the body output of the Get File Content action, but we must base64 encode it with an expression similar to the following:
base64(outputs('Get_file_content_-_Photo_Content')?['body'])For linking we concatenate the ‘serverUrl’ and ‘serverRelativeUrl’ obtained from the second Parse Json action in step 8.

12. Add a new flow action with the Office 365 Outlook connector ‘Send an email (V2)’. Add the recipient and in the subject we add the Title field of the get item from step 1. For the body we use outputs from the compose action in step 11.

We have reached the end of the flow and can now test to see if it shows up in our mailbox.
Next Steps
- Microsoft is likely to release an updated SharePoint Connector in the near future. At that point, using the native content would be recommended over this method.
- Building a custom connector that performs these actions may be of value for reuse if there is a delay in the native connector.
- Hungry? Follow my BBQ journey on Instagram ‘bbqtrails’